‏إظهار الرسائل ذات التسميات Samsung Galaxy Note 3 DUOS. إظهار كافة الرسائل

الخميس، 7 نوفمبر 2013

Samsung GALAXY Note 3 DUOS in China erhältlich

Bereits vor einigen Wochen waren erste Hinweise auf ein Samsung GALAXY Note 3 DUOS aufgetaucht. Das ist auch nicht weiter verwunderlich, denn alle großen Hersteller bringen Dual-SIM-Modelle ihrer Flaggschiffe auf den Markt. Der größte Markt für diese Modelle ist China, und genau dort ist auch jetzt bereits das Samsung GALAXY Note 3 DUOS erschienen. Und das ohne großes Brimborium, wie man es sonst von den Südkoreanern gewohnt ist.

Das Samsung GALAXY Note 3 DUOS wurde von den Südkoreanern noch gar nicht offiziell vorgestellt, da ist es schon in China erhältlich. Vielleicht verzichtet Samsung aber auf deine extra Vorstellung des Modelles, denn dieses wird wohl ausschließlich für den chinesischen Markt gebaut werden. Die technischen Spezifikationen sind dem des normalen GALAXY Note 3 gleich, außer, dass angeblich in diesem Modell kein Region Lock vorhanden sein soll. Doch das kann sich ja noch per Update ändern.


Das Samsung GALAXY Note 3 DUOS soll umgerechnet EUR 730,00 kosten, ein Verkauf in Europa ist offiziell nicht vorgesehen. Wer aber dennoch gerne auf eine Dual-SIM-Version des GALAXY Note 3 Lust hast, der muss sich dieses für teuer Geld importieren. Ob es dann aber hier funktionieren wird, muss noch geklärt werden. Würde mich nicht wundern, wenn auch für das GALAXY Note 3 DUOS per Update der Region Lock nachgeliefert wird.

Samsung GALAXY Note 3 DUOS ohne Region Lock
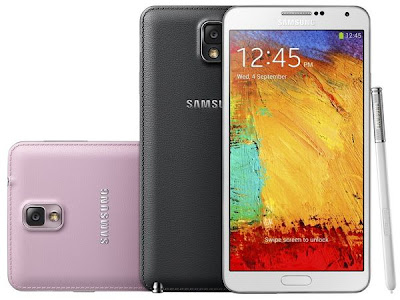
GALAXY Note 3, Galaxy Note 3 DUOS, Note 3, Note 3 DUOS, Samsung, Samsung Galaxy Note 3, Samsung Galaxy Note 3 DUOS, Samsung Note 3, Samsung Note 3 DUOS
Warum aber Samsung und auch andere Hersteller nicht die Dual-SIM Modelle bei uns verkaufen, bleibt ein Rätsel. auch das Samsung GALAXY Note 3 DUOS hätte hier sicherlich viele Freunde. Gerade da es auch als Business-Modell gesehen wird, würden viele User hier wahrscheinlich die Trennung von 2 SIM-Karten in einem GALAXY Note 3 bevorzugen für dienstliche und private Gespräche. Aber vielleicht denken hier die Hersteller doch irgendwann einmal um.

Quelle: Zing
-------------------------------------------------------------------------------------------------------

الأربعاء، 30 أكتوبر 2013

How to Disable KNOX Security Service on Samsung Galaxy Devices

How to Disable KNOX Security Service on Samsung Galaxy Devices

Samsung-Knox-Security
The are various instances of exploits bringing out the security vulnerabilities of Samsung’s flagship Galaxy devices. To arouse the trust of business class customers, Samsung also launched an ad campaign. However, it was with the launch of the Galaxy S4 that the company introduced a dedicated security service trademarked as Samsung KNOX.
Previously, the service was only available for people in enterprise and in government institutions. Later during IFA event in Berlin, Samsung  showcased some new devices like the Note 3, Note 10.1 2014 Edition, Galaxy Gear and also revealed the commercial availability of a its Knox mobile security system that helps better protect device data against unauthorized use.

What is Samsung KNOX?

In this way, if you have Knox installed on your device which you use as a personal and as a workplace phone both, Knox lets you store enterprise applications (corporate email, contacts, calendar, etc.) securely using an Exchange ActiveSync Server. The service is capable of separating personal and work data and thus it makes it possible for both types of data to coexist on a Knox-enabled device. You just have to press an icon to switch from personal to business mode.
Read Also: Download Viber for Android

                 Download Viber For Galaxy S3
                 Download Viber For Galaxy S4
                 Download Viber For Galaxy S2
                 Downgrade Samsung Galaxy S3
                 Downgrade Samsung Galaxy S4
                 Downgrade Samsung Galaxy S2
                 Downgrade Samsung Galaxy S3
                 Downgrade Galaxy S3
                 Downgrade Galaxy S4
                 Downgrade Galaxy S2
                 Download Viber
                 Viber Download
                 Unbrick Galaxy S3
Why Disable Samsung KNOX?
There’s no doubt that Samsung Knox service is really a good security solution for those who got a financial and business reason to protect their data, but there are still many others who might not like to have it on their device. If you are not a fan of the kind of security Knox provides and love to root your device and install custom ROMs on it without caring about the security warnings, we have come with some tips to disable Samsung Knox security shield on your device. Knox might also be responsible for FC (force close) error with some of your root perm apps, and so this is another sound reason to disable it.
If you have KNOX on your Galaxy device and you have rooted it, you’ll see a verification message that pops up every time SuperSU is called for action by some apps on your device. The message runs like this:
“SuperSU tried to access system in your device without authorization. This action was blocked”.
You can get rid of this annoying thing easily by disabling Knox service and its agent apps.

Disabling KNOX Using Terminal Emulator

  1. This method requires root access on your device.
  2. Download and install the Terminal Emulator app on your phone or tablet.
  3. Launch the app on your device and grant it root permission when prompted.
  4. When you see the command box, type the following command:
    su pm disable com.sec.knox.seandroid
  5. Doing this will disable Samsung Knox on your device

Alternative Method To Disable KNOX

Download and install an app that is capable of freezing system apps on Android devices.Titanium Backup is a good option. Open TB when it is installed and freeze the following apps:
  • com.sec.enterprise.knox.attestation
  • com.sec.knox.eventsmanager
  • KLMS Agent
  • KNOX
  • Knox Notification Manager
  • KNOX Store

Disabling KNOX Notifications

If you just want to disable Knox notifications on your Samsung Galaxy device, there is a good app available at the Google Play Store that requires root access and makes the job pretty easier:
knox-disabler-app
Here ends our easy-to-follow tips tip on turning all Samsung Knox services off on Samsung Galaxy devices. If you have a question or problem related to the topic, you can share with us via comments. Also, do not forget to give us your feedback on how it  worked for.

Root and Install CWM on Galaxy Note 2 GT-N7100 Running Android 4.3 JB Firmware

Root and Install CWM on Galaxy Note 2 GT-N7100 Running Android 4.3 JB Firmware

Root-Galaxy-Note-2-Android-4.3
The leaked version of the long awaited Android 4.3 Jelly Bean update for the Galaxy Note 2 GT-N7100 is out for a while now. Those who have already installed the test firmware have been looking for a way to root their device on the N7100XXUEM16 firmware. If you happen to be one such person, we bring you the easiest way to root your device and install a custom recovery on it.
In most cases people tend to to try a leaked firmware for some time as a deviation and then go back to the previous official version. Since the Android 4.3 test firmware is pretty stable, many of them might want to stick with it till the arrival of the official release. If you do not want to be with a device with stock firmware without root, the present guide will help you gain root access on your Galaxy Note 2 GT-N7100 with Android 4.3 Jelly Bean Firmware.
Read Also: Download Viber for Android

                 Download Viber For Galaxy S3
                 Download Viber For Galaxy S4
                 Download Viber For Galaxy S2
                 Downgrade Samsung Galaxy S3
                 Downgrade Samsung Galaxy S4
                 Downgrade Samsung Galaxy S2
                 Downgrade Samsung Galaxy S3
                 Downgrade Galaxy S3
                 Downgrade Galaxy S4
                 Downgrade Galaxy S2
                 Download Viber
                 Viber Download
                 Unbrick Galaxy S3

Disclaimer:

The rooting procedure described here is considered risky and might soft-brick your Galaxy Note 2. Despite of being a tested method, we do not guarantee that it is perfectly harmless. In most cases, the success of such drills depend on how careful you are in following the steps. Proceed at your own responsibility and do not blame us for any mishap.

Getting Prepared:

  • Download Odin and unzip it on your desktop: Odin3-V3.07.Zip
  • Download PhilZ Recovery: Philz_touch_5.15.0-N7100.Tar.Md5
  • Download the SuperSU rooting package and copy it to your device (internal or external storage): UPDATE-SuperSU-V1.65.Zip
  • Download and install either Kies Or Samsung USB Drivers on your computer.
  • Enable USB Debugging on your Note 2 with Android 4.3: go to Settings> More> Developer Options, tap the slider on the top of the page and check the box in front of USB Debugging. In case you do not find the developer options, enable it Using This Guide.
  • Charge your device to ensure at least 50% battery.

Installing PhilZ CWM Recovery on Note 2:

When you are sure that you have made all required preparations and gathered the tools, follow the following steps to install the customized version of CWM recovery.
  1. Boot your Note 2 into Download Mode. To do this, press and hold the Volume Down, Home and Power buttons simultaneously for 2-3 seconds. When you see the warning screen, press the Volume Up key.
  2. Launch Odin and connect your device to PC via USB cable.
  3. Wait till the ID:COM port turns Blue and you see “Added!!” message on Odin.
  4. Now click the PDA button and select “philz_touch_5.15.0-n7100.tar.md5“.galaxy-note-2-root-android-4.3
  5. Then click the Start button and wait till it is flashed to your device.
  6. Finally, you will get PASS!! message at Odin and your Note 2 will reboot automatically.
When your device boots up, it will have PhilZ CWM Recovery installed on it. Congrats!

Rooting Galaxy Note 2 on Android 4.3:

  1. Make sure you have copied the SuperSU zip file on your Note 2.
  2. Now boot it into Recovery Mode. To do this, press Volume Up, Home and Power keys at the same time for 4-6 seconds. Keep the keys pressed till you enter the PhilZ recovery main menu.
  3. Go to “install zip from sdcard” option and select “UPDATE-SuperSU-v1.65.zip”.
  4. Select “yes” to confirm installation and wait till it is flashed.
  5. Now return back to main menu in recovery and select “reboot system now”.
Your Galaxy Note 2 will boot now. When your device becomes functional, open app drawer an look for a new app named “SupeSU” there. If you can see this app, your device is rooted. To verify proper root access, install Root Checker app from the Play Store and run it.